Shelter Over Spring

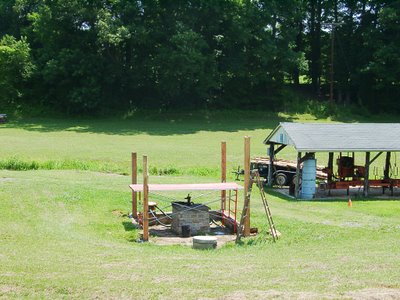
The top picture shows the start of rebuilding a shelter over a spring which is located behind my house.
A spring is a small flow of fresh, clean groundwater coming to the surface naturally. This particular spring supplied drinking water for some of my ancestors as far back as the 1880's. They dipped water from a small basin and carried filled buckets up a hill to their house over two hundred feet away. This was their only water supply for all home and personal needs.
During long dry periods, this spring water flow diminishes only slightly. I measured the normal flow at around two gallons per minute when the reservoir is full and around 15 gallons per minute after I power-pumped the reservoir down to near empty. I can pump around 200 gallons into barrels before the suction hose begins to slurp air. It takes about twenty minutes for the natural flow to refill the spring storage space. I use this water supply to pour onto plants and to wet a mulch pile.
The last roof over this spring area was built by my father around 32 years ago. He used locust posts to support the roof. Those posts lasted around 10 to 12 years before they decayed. I replaced them by raising the roof off those rickety locust posts and installed 5" X 5" treated posts. I lowered the old roof onto the newly planted posts. The treated-pine posts I used lasted about 15 years in the constant wet ground. About 5 years ago, I accidentally hit one corner support post with a tractor implement and the rotting post broke which caused the old roof to collapse. I hauled the resulting rubble to the landfill.
This summer I committed to rebuild the semi-shelter structure. I milled eastern red cedar logs into 6" X 6" dimensions for support posts as shown in the top photo. My wife helped me get them plumb and near square before I permanently secured them in the wet ground with cement. I say "near square" because the structure is "out-of-square" by 8" when the diagonals are measured. I know this is not quality building, but I could not feasibly move three holes to correct this condition. Only critical eyes can notice this error as it reveals its effect on the underneath side of the roof.
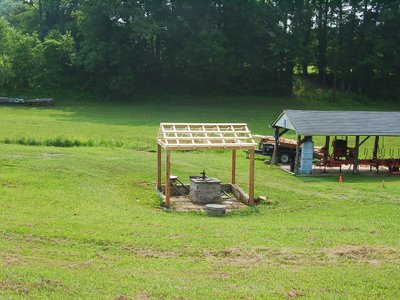
My wife helped cut the posts level, raise two 3" X 6" beams between each pair of posts, measure, saw and nail rafters. The time to complete this part was 5 hours spread over two days (early mornings). See completed rafters in photo below. My pneumatic nail gun and compound miter saw enabled this efficiency. I used white pine to construct the beams, rafters, and braces from logs I milled into full sized lumber.
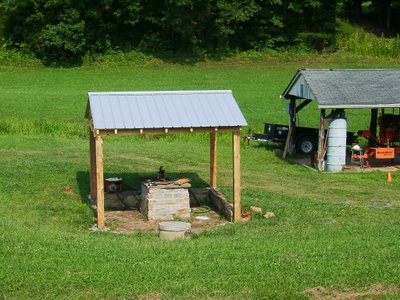
Unpainted Galvalume metal and one skylight were used for the roof covering. We attached these materials in place with screws after lunch one 90 degree day. My wife was not enthusiastic about helping as she assisted in that heat. The current status of the shelter is shown in the bottom photo.
The next step will be to nail face-boards to the rafter ends, fill-in the gables with woodwork, and paint exposed wood. This can wait until cooler times.
I expect these cedar posts to last from 50 to 100 years.
The out of pocket expense for this project was $146.38.
Return here Monday, July 17 for an update about the water flow into and out of this spring.
Have a good day!


Labels: Woodworking


2 Comments:
Mike,
I plan to help Doreen with wage negotiations on this and future projects! I like your "code" words for her attitude---"not enthusiastic"--- means the neighbors heard her screaming as you dragged her out to the shed! At least you could take the poor woman out for a night on the town!
Tim
Tim,
I plan to take her out for a night on the town next week in San Fernando, El Segundo, or Simi Valley, California. When we clink our glasses following my toast, we'll think about your suggestion.
Thanks,
Mike
Post a Comment
<< Home